Showing posts with label Breakfast. Show all posts

Fruit Pizza


Well, geez.  All these strawberries and grapes look a bit out of season now, don't they?

Every once in a while I think, man, I should have a blog.

Then I remember that I do have one.

Here's the truth: it's a stressful time right now.


We're facing a move and an uncertain employment future.

I have a limited number of evenings, after the children have gone to bed, when I don't have to make a grocery list, send semi-important e-mails, or deal with the kids waking up.

Lately I've been spending them on cross-stitching, binge-watching Friends, and the occasional foreign romance.

Eases the stress.


But I AM still cooking, and I DO still want to share it.

So here is a fruit pizza!  Easy and yummy, just a few weeks behind.

Fruit Pizza

Easy peasy!

Your favorite pizza dough (I like this one)
8 oz cream cheese
powdered sugar to taste (I was doing a breakfast pizza, so I used about 1/2 cup.  A dessert pizza would call for more)
Fruits of choice

Bake your crust!  Mix your sugar and cheese and spread!  Slice and top with fruit! 

Chocolate Dipped Waffles


Phew, sorry about that.  All that canning.

ALL THAT CANNING.  I canned it all.

There will be a post shortly featuring my library of canned goods.

For now however I give you chocolate waffles.


I love waffles.  They are so versatile.  Savory(ish) with chicken, waffle sandwiches, just plain old waffles with butter and syrup.

Can't go wrong!

In France waffles have a unique spin - they aren't breakfast or dinner, but a snack.

Des gaufres, often dipped in chocolate and/or sprinkled with crispy pearl sugar are widely available.


You can buy them pre-wrapped in the supermarche, about the same quality as your average Ho Ho (okay, maybe a little better).

You can get them in a patisserie with lovingly caramelized sugar baked in.

It's something I've been wanting to re-create for a long time.  But for a few years, try as I might, I just couldn't get waffles right.

They always came out...floppy.


Floppy waffles may occur naturally with aging, but I wasn't ready to give in to them just yet.

Anyway, long story short, the mighty Google has finally led me to this pearl (sugar) of a recipe.

The chocolate shell was my own creation.

The smiles on my kids' faces?  I'm taking credit for that as well.

Chocolate Dipped Waffles

The recipe that saved me here was the Waffle of Insane Greatness.  Where did it originate?  Who created it?  I don't know!  You can find it on all the big food sites *now*, but I salute the chef who created it.  And named it.  That name is a winner.

3/4 cups flour
1/4 cup cornstarch
1/2 teaspoon baking powder
1/4 teaspoon baking soda
1/2 teaspoon salt
1 cup whole milk or buttermilk
1/3 cup vegetable oil
1 egg
1 1/2 teaspoons sugar
3/4 teaspoon vanilla extract

Chocolate shell:
1/2 cup bittersweet chocolate chips
3 tablespoons coconut oil

In a medium bowl, combine the flour, cornstarch, baking powder, baking soda and salt.  Mix together.  Add the milk, vegetable oil, egg, sugar and vanilla and mix well.  Let the batter sit for 30 minutes.

Cook on waffle iron according to manufacturer's instructions.  Couldn't be easier!

For chocolate coating, heat chocolate chips and coconut oil together in a double boiler.  When melted and completely combined, remove from heat.  Dip waffle quarters quickly, let dry on wax paper.  Mangez.

Dairy-Free Breakfast Nachos


You can have nachos for breakfast - why not?

Here's the thing, too.  These don't have cheese in them.


I'm keeping it quiet, because cheese is one of my oldest and dearest friends.  And I don't want to hurt its feelings.

But you know, some foods have enough stuff going on that they just don't need cheese.


Shh!  Hear me out.

Mexican food, with its lime, its cilantro, its salsa, its guac, its raw white onion.  Leave the cheese off, you won't even notice.


Observe that the most authentic Mexican food at most only uses a sprinkling of queso cotija.  It's a condiment, a light sprinkling.

In the summer I like my dishes light (if you can call something with guacamole and a fried egg on it light).


But please don't tell cheese - we have a scheduled rendezvous coming soon, and I wouldn't want things to get awkward.

Dairy-Free Breakfast Nachos

some chips
a egg
salsa
chopped white onion
1 can black beans
cilantro, torn
guacamole
lime juice

The nice thing about nachos is you really can make them to taste.  I created the guacamole here by mashing up avocado, lime juice and salt (about 1/2 lime and a generous pinch of salt per avocado).  Put it together how you like, fry an egg and put it on top.  Ta da!  Breakfast.

Lavender Rolls


I have been dreaming of these since December, and the time was finally ripe.

You could grind up the lavender if you wanted, it might look prettier.


I didn't mind the little flowers scattered in the dough, though.  I could use more little flowers scattered in things, actually.

Just in general.


The taste was perfect, not too strong and not too subtle.

Just use it the same way you would use cinnamon.


I thought about dying the frosting purple.  Maybe I should have.

I used mascarpone cheese in the frosting instead of cream cheese.  I don't like the tang of cream cheese frosting.  Mascarpone brought that cheesy smoothness without the tang.


If I ever have any kind of food shop, these will be the specialty.

Lavender Rolls
Recipe adapted from Averie Cooks
Makes 12

Rolls:
4 1/4 cups all-purpose flour
1/3 cup granulated sugar
2 1/4 teaspoons dry yeast (one packet)
pinch salt
6 tablespoons butter, melted
3 large eggs
3/4 cup buttermilk

Filling:
1/2 cup butter, softened
1 cup granulated sugar
4-6 teaspoons lavender flowers

Mascarpone Frosting:
1/2 cup butter, softened
6 ounces mascarpone cheese
1 tablespoon vanilla
3 1/2 cups confectioners' sugar

Combine 4 cups flour, 1/3 cup sugar, yeast, and a pinch of salt in the bowl of a stand mixer.  Warm buttermilk to 100F on stove.  Add melted butter, eggs, and buttermilk to dry ingredients and beat on medium-low for about 1 minute, until combined.

Switch to the dough hook and run for 10-12 minutes (15 - 18 minutes by hand).  If more flour is needed, add remaining 1/4 cup flour, 1 tablespoon at a time, until the dough clears the side of the bowl but sticks to the bottom.  It's okay for this dough to be sticky.

Place the dough in a greased bowl and cover with plastic wrap.  Place in a warm, draft-free place to rise for about 2 to 2 1/2 hours, until doubled in size.

Prepare your pan, this can be a jellyroll pan or ordinary 9 x 13 inch baking pan.  Line with foil or a silpat and set aside (if using foil, grease with butter).

After dough has doubled, turn it out onto a floured surface and roll into a 16 x 12 inch rectangle.

Spread butter for filling over the dough, in chunks or fully spread out, depending on softness of the butter.  Sprinkle evenly with 1 cup of sugar, then with lavender flowers.

Roll your rectangle up into a big dough log.  Slice into 12 slices.  The best way to do this is with dental floss, but don't use the mint flavored kind unless you want minty lavender (hmm).  If you don't have unflavored floss around, use a sharp knife to avoid squishing the dough as much as possible.

Place slices on prepared pan and let rise in a warm, draft-free place until the rolls have doubled in size about 1 1/2 hours (rolls can also be refrigerated before this second rise for up to 16 hours, bringing to room temperature and continuing with rise the next day).

Bake at 350F for 22 - 25 minutes or until lightly golden on top.  Cool slightly (or don't), spread with mascarpone frosting, and eat.

For frosting:
Blend cheese and butter on medium speed, about 1 minute.  Add the vanilla and 3 cups confectioners' sugar and beat until smooth and fluffy, about 3 minutes.  Add remaining cup of sugar to taste, based on desired frosting consistency.

Blood Orange Marmalade


What are your thoughts on marmalade?

I really am on a bitter kick lately, although wait be fair!  This is only just a little, teensy weensy bit bitter.


The peel is softened overnight, soaked in water and juice to lose most of its bite.

Most of it...not all.


Strawberry jam it ain't, is all I'm saying.

But friends and neighbors if you put this junk on a bakery-fresh English muffin you picked up while jogging (jogging with muffins in hands is an acceptable way to add strength-training to your cardio regime)...


Top it with clotted cream, which is like butter but creamier and without the salt.  Like if whipped cream and butter had a baby...

And then dollop on this bittersweet madness, you will just go to food heaven.


You will, I promise.

Sort out your affairs, because it will be the end.


Blood Orange Marmalade
adapted from the love website Food in Jars

1 lb blood oranges (4-5 medium sized fruits)
2 1/2 cups white sugar

Wash oranges well.  Trim away ends and slice in half.  Core with very sharp knife, removing white inside.  Pluck out any seeds you see.  Keep ends and cores for now.

Halve oranges and slice them very thin, about 1/8 inch thickness.  Keep slices together in shape and cut again, quartering the orange.  You should have little triangles of orange.

Bundle up seeds and cores in cheesecloth and tie tightly.  Place chopped oranges and cheesecloth bundle in a medium bowl.  Cover with about 3 cups of water, chill overnight.

Discard cheesecloth bundle.  Combine remaining fruit and water with white sugar in a medium saucepan.  Bring marmalade mix to a simmer and cook until reduced by more than half and sugar thermometer reads 220.  When it is finished, pour into prepared jars.  Wipe rims and put on lids, turning them to 'fingertip tightness'.

Submerge jars in boiling water bath for 10 minutes,*  Leave to dry and seal overnight.

*!arning, read up on canning here if this is your first attempt.  I can't take responsibility for anybody's botulism!  But really, it's pretty easy once you know the rules.  The botulism-destroying rules.

Cinnamon Yogurt Twists


The weather is crazy!

This is the time of year I like to call "High Fall."


Its royal colors are iron gray and deep yellow.

My coat is deep yellow too!  But all the buttons are missing.  Can't have everything (don't wear your non-maternity clothes when you're pregnant).


There are frosty veins on rusty leaves when we walk to the crepe stand.

(They opened a crepe stand nearby!)


Fall is dramatic as an opera.

The down-side is the cold, of course.  It's started seeping in the windows and the places where you can see daylight in the doorframe of this 1970's house.


I guess I'd better get sewing those buttons back on.  And picking which knit hat I'll be wearing from now until April.

Cinnamon Yogurt Twists
taken from Taste of Home

Sometimes there is a fine line between a snack and a dessert.  These could even qualify as a breakfast, if you wanted them to.  They made a lovely snack or small lunch served with tea and pears.  Crunchy and sweet but not quite dessert sweet.  Cinnamon is the flavor of fall.

1 package (1/4 oz) active dry yeast
1 teaspoon salt
3 3/4 - 4 cups all-purpose flour
1 cup butter, cubed
1 cup plain yogurt
1/4 cup water
2 eggs
1 teaspoon vanilla extract
3/4 cup sugar
2 teaspoons cinnamon

In a large bowl combine the yeast, salt, and 2 1/2 cups flour.  In a small saucepan heat the butter, yogurt and water to 120-130 degrees Fahrenheit, add to dry ingredients.  Beat on medium speed for two minutes.

Add the eggs, vanilla, and 1/2 cup flour, beat 2 minutes longer.  Stir in enough remaining flour to form a stiff dough.  Do not knead.  Cover and refrigerate for 2 hours or overnight.

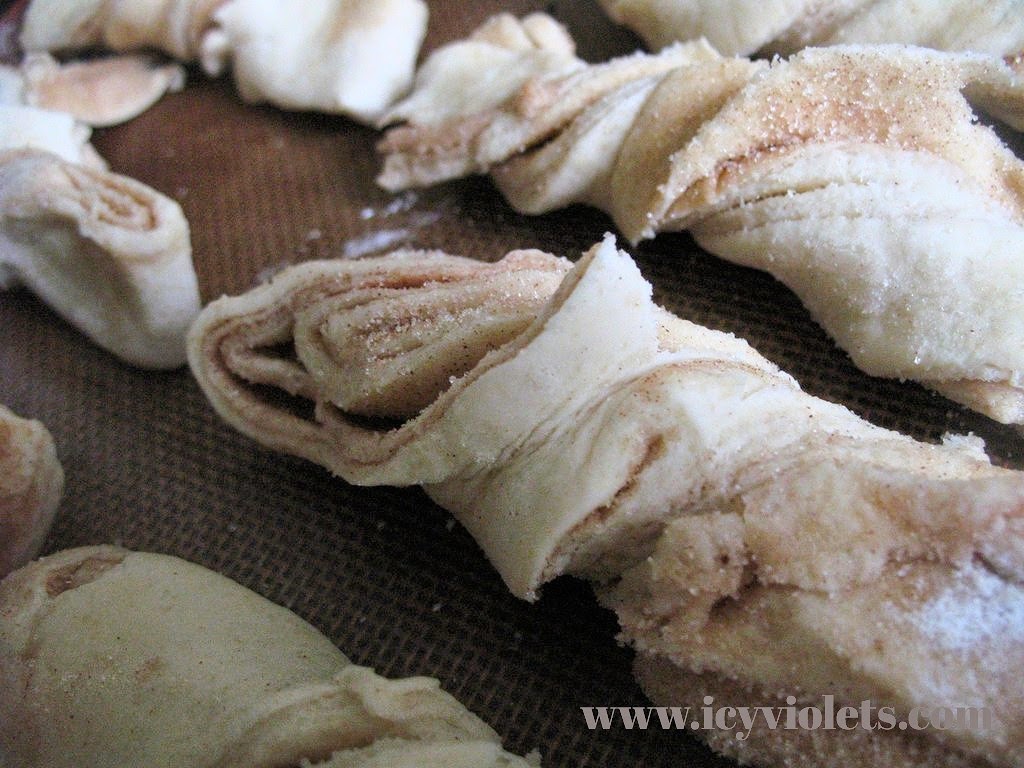
Combine sugar and cinnamon; set aside.  Punch dough down (whee!).  On a lightly floured surface, roll dough into a 12-in. x 9-in. rectangle.  Sprinkle 3 tablespoons cinnamon sugar over the dough; fold dough into thirds.  Give the new rectangle a quarter turn and repeat rolling out, sprinkling, and folding.  Do this three more times, totaling four roll-outs.

Roll into a 12-in. x 6-in. rectangle.  Cut into 24 1/2-in. wide strips.  Twist the strips!  (fun)  Place on baking sheet.  Cover and let rise until doubled, about 30 minutes.  Bake at 350 F for 14-18 minutes or until golden brown.

Chilaquiles Verdes


Chilaquiles are like a Mexican version of nachos.

Did you think nachos were Mexican?


*food snob moment*

Apparently tortilla chips aren't even properly Mexican!  Although I hear they're catching on.


(And I'm really not judging, just because they aren't Mexican doesn't mean they aren't delicious after all.)

But back to chilaquiles.  It's like nachos except you make your own tortilla chips and then soak them in salsa, red or green depending on your mood.


I'm pretty sure that if you want to change a food from Mexican-American to straight up Mexican, just replace cheese with salsa.

Also cut the cumin.  And no sugar!  I'm looking at you, fans of sweet chicken tacos.


Geez, such a snob.  Sorry, I'll stop.

(I won't, I live for this)


Sprinkle these with queso fresco, some white onion slices, cilantro and crema and there it is.

The breakfast of your dreams!


They're wonderful for using up aging ingredients like excess tortillas or salsa.

Some people top them with fried eggs.  I didn't go so far in my endeavor.

Don't judge my messy kitchen!  This is how I live.

Go where I did not.


Chilaquiles Verdes
adapted from The Food Network

I made my own salsa but you certainly don't have to.  For a more authentic flavor that can be found in most grocery stores I recommend La Costena brand.  Of course if you have access to more locally made, go for it!

1 lb tomatillos
3 jalepeno peppers (or serranos)
6 garlic cloves
1 large white onion
olive oil, as needed
salt and pepper
1/2 cup fresh cilantro leaves
1/3 cup vegetable oil
10 corn tortillas, the staler/dryer the better
queso fresco, to taste
Mexican crema (sour cream works too), to taste
Sliced white onions, to taste
Fresh chopped cilantro leaves, to taste

Preheat broiler.

For the salsa:  peel and rinse the tomatillos.  Put chiles, onion and tomatillos on a baking sheet.  Season with a little olive oil and salt and pepper.  Broil until softened and slightly charred, about 7 minutes.  Take the tops of the chiles, put broiled things and fresh garlic in a blender with about 1/4 cup of water, and blend until smooth.

For chilaquiles:  heat 1/3 cup vegetable oil in a pan over medium/medium-high heat.  Fry dry tortillas until browned and crisp.  Drain tortillas on paper towels and wipe oil out of pan with a paper towel.  Add salsa in, bring to a simmer.  Break up tortillas into halves and quarters and toss into the salsa.  Cook together about 5 minutes.

Pour tortilla/salsa mixture into a serving bowl and top with queso fresco, creme, fresh sliced onions and fresh cilantro. 

Maple Blueberry Buttermilk Scones


What can I say about maple and blueberry together?

Smoky sweet and juicy bright?

Are those names of My Little Ponies?


I had so many of those when I was a kid.

How is everybody doing?

I'm all right.  A bit chilly.


Can you believe this cold snap is happening?  In May.  Ksh.

Also:  I am looking for a house.  Because we are getting kicked out of ours (the university MUST have a WOODSHOP!).

Anybody have a house for me?


I will trade you scones for it.

I will pay all my bills in scones.

I'll let you know how that works out.


Maple Blueberry Buttermilk Scones (adapted from Joy the Baker)
makes about 12 scones

3 cups all-purpose flour
2 1/2 teaspoons baking powder
1/2 teaspoon baking soda
pinch of nutmeg
3/4 teaspoon salt
3/4 cup cold unsalted butter, but into small cubes
1 large egg, lightly beaten
2 tablespoons pure maple syrup
3/4 cup cold buttermilk
1 cup fresh blueberries
3 tablespoons buttermilk for brushing the tops of the scones before baking

Preheat oven to 400 degrees F.

In a mixing bowl, sift together flour, baking powder, baking soda, pinch of nutmeg, and salt.  Cut in butter (using your fingers or a pastry cutter) until mixture resembles a coarse meal.  Work the butter into the dry ingredients until some of the butter flakes are the size of peas and some are the size of oat flakes.   

In another bowl, combine egg, maple syrup, and milk and beat lightly with a fork.  Add to flour mixture all at once, stirring enough to make a soft dough.  Fold in the blueberries.

Turn out onto a floured board and knead about 15 times - use a light touch, try not to melt the butter.  Roll or pat out into a 1-inch thickness.  Cut into 2-inch rounds using a round cutter or cut into 2×2-inch squares.  Reshape and roll dough to create more scones with excess scraps.    Place on an ungreased baking sheet.     Brush lightly with buttermilk.  

 Bake for 15-18 minutes or until golden brown on top.  Serve warm.  

Overloadeded Spicy Cheddar Muffins

 
I am going to tell you how to make homemade popcorn.

Because you know what?  You don't need a popper, air or otherwise.  All that is a scam.

A scam!


All you do is, pour about 2 teaspoons of vegetable oil into a large pot and put it over medium-high heat.

Add in 1/4 cup popcorn kernels.

Affix a lid, slightly ajar.

Hey girl, you look like you could use a muffin.

And WAIT!  The pops, they will come.

When the pops lessen, remove from heat.

Drizzle in butter and sprinkle in salt.  Or be creative and add parmesan or cinnamon, or seaweed.


Why am I telling you how to make popcorn in this post about cheese muffins?

Because that is the kind of week it has been.

Right now I am making cupcakes, eating popcorn, and blogging about muffins.


Busy baby, yeah.  And I like it that way.

(Unless it's too much because then BOOM and you can ask my husband about when that happens but you know what you probably shouldn't let's just let it go)

Overloaded Spicy Cheddar Muffins (adapted from Joy)
Makes 12

So you may have noticed I am still joyfully welcoming dairy back into my life.  Everything I'm making this week seems to have cheese in it somewhere...no regrets! 

1 cup white rice flour
1/2 cup almond flour (you can replace both of these with 1 1/2 cups all-purpose flour)
1 tablespoon baking powder
1/2 teaspoon salt
1 cup whole milk
1 large egg
1/4 cup unsalted butter, melted and cooled slightly
3 cups grated sharp cheddar cheese
12 sliced pickled jalapenos for topping
sea salt and fresh cracked black pepper for topping.

*One note from Joy about using paper cupcake liners with these muffins!  "When warm, the muffins will stick to the paper.  When muffins are room temperature, the papers will come out of the papers easily.  To avoid this nonsense, just grease and flour a muffin tin instead of using cupcake liners."  I found her to be correct on this.

Place a rack in the upper third of the oven and preheat oven to 375 degrees F.  Grease and flour a 12 cup muffin tin and set aside.

In a medium bowl, whisk together flours, baking powder and salt.  Set aside.

In a small bowl, whisk together milk, egg, and melted butter.

Add the wet ingredients all at once to the dry ingredients.  Stir to incorporate.  Before the mixture is entirely mixed, add the grated cheese.  Stir to incorporate making sure that the mixture is evenly moistened and the cheese is well distributed.

Divide batter between prepared muffin tin.  Top each with a jalapeno slice and sprinkle with sea salt and cracked pepper.

Bake muffins for 20 to 25 minutes, or until golden brown and cooked through.  Muffins are best served warm. 

Dairy, Wheat, and Sugar-free Nutty Granola


I sometimes think humans should hibernate.

Am I the only one who gets that urge?

Sometimes I don't even realize I've been hibernating until spring.

Oh look, it's light past four in the afternoon.  Maybe I'll go outside.


How exhilarating!

Oo hey, there are random color patches and sweet-smelling things coming out of the ground.

What devilment is this!

I rub my red-rimmed, computer-exhausted winter eyes and consider.


Maybe there's hope, after all?  Maybe for a while we can live, and not just exist.

Tl;dr?  Welcome spring!

Dairy, Wheat, and Sugar-Free Nutty Granola
I've been shamefully hoarding my precious few recipes that fit this crazy diet I'm on, assuming no one would want them.  But I've actually been asked about this one!  And actually, folks, it's pretty tasty.  It isn't sweet, but it's nutty and full and just a little bit salty.  It's oat-y and peanut-buttery and just about my favorite thing to eat, off the very short list of things I can presently eat.  My advice?  Try it out.  You won't miss your ordinary noley.

Makes 9 cups granola

6 cups oats (if you can find gluten-free oats, this can be gluten-free!  Otherwise be careful, because oats often have some gluten in them)
1 cup almonds (or other nuts/seeds)
1 cup pumpkin seeds (or other nuts/seeds; I had cashews and hazelnuts around)
1/2 cup sunflower seeds (or other nuts...you get the idea.  Customize!)
1 teaspoon salt
3/4 cup oil (coconut is tastiest, but olive oil or plain vegetable work in a pinch)
3/4 cup nut butter (almond, peanut, whatevs man)
1/4 cup almond milk (for the sweet toof'd you could use honey, but I have to skip it)

Preheat oven to 350 degrees Fahrenheit.  Line a baking pan with foil (this really is worth it...not only in terms of clean-up but in terms of getting the granola into a container after it's cooked, lifting it with the foil and pouring it in beats shoveling it out with a spatula a hunnerd times over).

In a large bowl, mix together oats, nuts and seeds, and salt.  In a small bowl whisk together oil, nut butter, and almond milk.

Add wet ingredients to dry and mix thoroughly, so all dry ingredients are moistened.

Pour into lined pan, smooth into as flat a layer as you can get.

Bake 15 minutes, take out and toss, smooth flat again, and bake another 15 minutes.

For the full GFCF experience, eat with almond milk.  For a real treat, eat with coconut milk.

Earl Grey Tea Cakes with Lemon Icing

 
Tea cakes, tea cakes, pretty little tea cakes.

Blue.  Baby blue.  I like blue at tea time.


Have you had Earl Grey tea?  I could leave the tea, but I tell you I'm crazy about that bergamot orange.

Have you heard of a bergamot orange?  They're pretty, yellow little things.  Less sour than lemons but more bitter than grapefruits.  I guess you don't really eat them plain, but they make a lovely jam.


Or tea.

Or tea cake.


These cakes require a doily.  Do you have a doily?

No?  No tea cakes then.


Them's the rules.

Earl Grey Tea Cakes with Lemon Icing (adapted from Foodie with Family)

Makes 12

1 cup whole milk
3 Earl Grey tea bags or 5 tablespoons loose leaf tea
1/2 cup butter, at room temperature
1 cup sugar
2 eggs
1 teaspoon pure vanilla extract
1 1/2 cups all-purpose flour
1 teaspoons baking powder
1/4 teaspoon salt

Lemon Icing
1/2 stick butter, softened to room temperature
2 cups powdered sugar
3 tablespoons heavy cream or chilled infused Earl Grey whole milk
1 teaspoon lemon extract

Pour the milk into a heavy-bottomed saucepan with a tight fitting lid. Scald the milk (heat until it is steaming and many tiny bubbles have formed in the milk around the edge of the pan). Add the tea bags, remove the pan from the heat and put the lid in place. Let the milk cool to room temperature. 

When the milk is cool, squeeze the excess liquid from the tea bags or strain out the loose leaf tea and discard. Measure 1/2 cup plus 1 tablespoon of the cooled infused milk and reserve the rest.

Preheat oven to 375°F.  Line a 12-cup muffin pan with paper liners.

In a stand mixer fitted with the paddle attachment (or a mixing bowl with an electric hand-held mixer) beat together the butter and sugar until lighter in color and fluffy. 

Add the eggs, one at a time, beating well after each addition and scraping down the bowl. Add the vanilla extract and beat well. 

In a separate bowl, whisk together the flour, baking powder and salt.

Add about 1/3 of the flour mixture to the butter/egg/sugar. Beat on low just until combined. Add about 1/3 of the infused milk that you measured. Again, beat just until combined, scrape down the sides of the mixing bowl and repeat -flour, milk, flour, milk- until both flour and milk are completely incorporated. 

Fill the cupcake liners about 2/3 full of cupcake batter.

Bake for 18-22 minutes, or until they spring back when pressed lightly or a toothpick inserted into the center of a cupcake comes out clean.

Let the cupcakes cool in the pan for 5 minutes before turning out onto a cooling rack to finish cooling completely.
 
To Make the Lemon Icing:
In a stand mixer fitted with the whisk attachment (or a mixing bowl with a handheld electric mixer) beat the butter on high until it is light and fluffy. Gradually add in the powdered sugar until incorporated. Then, with the mixer on high, whisk in the cream or infused milk and the lemon extract until the icing is light and fluffy. Use an offset spatula to smear the buttercream on the cupcakes or load it into a pastry bag with a big tip to pipe on the frosting.