Showing posts with label Side Dishes. Show all posts

Roasted Beet and Quinoa Salad with Goat Cheese


One last winter recipe, hey?

One for the road.

A little root vegetable here, a little storable grain there, and voila!


Something that might last you a few months if you hid it in a cool cellar.

(Not in prepared form...don't do that.)

You can cheat with a little goat cheese, if you are into cheating.  My heart is still with you, goat cheese.


Adds a little tang, a little salt to the earthy sweet of the charred beets.

I made this as a side-salad. 

Don't do that either.


This is a meal.  One last winter's meal, then it's all pea tendrils and rhubarb from here on out.

Woo!

Roasted Beet and Quinoa Salad with Goat Cheese (inspired by Deb Perelman  at Smitten Kitchen)

1/2 cup uncooked plain quinoa, rinsed
coarse salt
3 small shallots
olive oil
1 1/2 pounds beets, tiny if you can find them and peeled if you can’t, scrubbed, trimmed, and halved or quartered to bite-size pieces
juice of 1/2 a lemon
black pepper
dab of goat cheese (optional)

for the dressing:
2 tablespoons apple cider vinegar
1 tablespoon balsamic vinegar, plus more for finishing
2 big pinches of coarse salt
3 tablespoons olive oil
black pepper

Heat oven to 400°F.

Add quinoa, 1 cup water, and a pinch of salt to a medium pot and bring to a boil. Reduce the heat to about medium and cook until the quinoa has absorbed the water, 10 to 15 minutes. Cover and set aside.

Meanwhile, prepare beets. Peel shallots and place in a square of aluminum foil. Drizzle with a few drops of olive oil, wrap the foil to create a packet and place in the oven.

Coat a baking sheet lightly with olive oil. Place the beets on the baking sheet and arrange in one layer, drizzling lightly with a little more olive oil. Squeeze lemon juice over and season generously with salt and pepper.

Place beets in the oven and roast for 20 minutes, then stir/flip them around and roast until tender and crisp at the edges, about another 10 minutes. (Larger beets will take a few more minutes).

Meanwhile, make the vinaigrette. Remove the shallot packet from the oven and carefully take out the shallots. Toss the roasted shallots into a food processor or blender with the apple cider and balsamic vinegars, 2 pinches of coarse salt, and a pinch of black pepper. Blend until smooth. Drizzle in the olive oil. Taste and season with more salt and pepper if necessary.

Spoon three-quarters of the quinoa onto a serving platter. Arrange roasted beets over the quinoa, and top off with the rest of the quinoa. Drizzle the entire dish with the vinaigrette. Serve with an extra drizzle of balsamic vinegar if you’d like or a few crumbles of goat cheese.

Brown Butter Rosemary Corn Bread


Ordinarily, I am a sweet cornbread kind of gal.

Big, fluffy cakes?  With butter?  And honey?  And honeybutter?

Or maybe maple syrup.

And cinnamon?


Yes please.

But every once in a long while, something savory tickles my fancy.

Have you had brown butter yet?

Exquisite.


The liquid and the solids separate, and the liquid turns a nutty brown while the solids darken and sweeten.

If you are using salted butter, it will leave behind (and also carry with it) a fine coating of crystallized salt.

I like to do it with salted butter.

Dip this in chili.


Cover this in cheese and sour cream.

Or just slice and eat it, because it's tender and cakey and tasty enough to do that.

Cornbread, you have a summer home in my heart.


Brown Butter Rosemary Corn Bread (adapted from Joy the Baker)
I wanted to do this sugar free, but the original recipe adds in a 1/3 cup of granulated sugar.  Feel free to do so!  If you're into that sort of thing.

1/2 cup (1 stick) plus 1 tablespoon unsalted butter
2 large eggs
1 cup buttermilk
1 cup all-purpose flour
1 cup coarse ground cornmeal
1 teaspoon salt
3/4 teaspoon baking soda
2 tablespoons chopped fresh rosemary

Place a rack in the upper third of the oven and preheat oven to 350 degrees F.  Grease and 8×8-inch square baking pan.  Line with parchment paper and grease and flour the baking pan.  Set aside.

In a light-colored small saucepan, melt the butter over medium-low heat.  Melt and cook butter down completely.  It will sizzle and crackle.  Keep an eye on the butter and you’ll see brown bits begin to form at the bottom of the pan.  Swirl pan and cook until browned bits are a chestnut color and the butter smells nutty.  Remove from heat and allow to cool.

In a medium bowl, whisk together eggs, buttermilk, and browned butter.  Set aside.

If using sugar, in a large bowl blend together sugar and chopped rosemary.  Blend with the back of a spoon working the rosemary flavors into the sugar.  If not using sugar, skip this step.  But rosemary sugar is probably really cool.

Add flour, cornmeal, salt, and baking soda to the large bowl with the flavored sugar.  Whisk to combine.

Add the wet ingredients all at once to the dry ingredients.  Stir to combine, ensuring that all of the dry ingredients are moistened and incorporated into the batter.  Pour batter into prepared pan and smooth to the edges.  Bake for 20 to 25 minutes, or until a skewer inserted in the center comes out clean.

Remove from the oven and allow to cool for 10 minutes before slicing and serving.  Bread is best served warm and will last, well wrapped, at room temperature for up to three days.

Brussels Sprouts with Pomegranate Honey and Toasted Pecans

 
I am falling for sprouts.

They're just so cute.

Like little teeny cabbages.

Widdle teeny cabbages.

Who's cute!  You are!


Oh yes you are!  Oh yes you are!

Did you know they grow on a stick?  Like this?

Adorable!

And, for all the bad press they get, they are surprisingly delicious.  Crisp, green, and just a bit earthy.

My stand-by sprouts recipe is this one, to be served alongside hot links.  They go amazingly well with pig of any sort, so if you haven't tried it, it's a good place to start.


But it's Christmas so, why not pomegranate!

Red and green!  Get it?

You got it!

Your reward is brussels sprouts.

Brussels Sprouts with Pomegranate Honey and Toasted Pecans (adapted from Simple Bites)


4 tablespoons butter
3 cups Brussels sprouts, washed and halved
4 tablespoons pomegranate honey (see notes)
1/2 teaspoon kosher salt
1/2 cup toasted pecans, chopped
1 large pomegranate, de-seeded (watch TV while you're doing this, it'll make it fly)
1 cup pomegranate juice
1/4 cup honey
To make the pomegranate honey, reduce 1 cup pomegranate juice by half over medium-high heat. Add in 1/4 cup honey and simmer until thick. 
Over medium-high heat, melt the butter in a large sauté pan. Add in the Brussels sprouts and cook just until they turn a vibrant green, about 3-5 minutes, stirring only occasionally to allow edges to brown. Add in the pomegranate honey and the salt. Stir to coat the sprouts, and then pour in the pecans.
Remove from heat and stir in the pomegranate seeds. Serve warm.

Garlic Onion Cheesy Bread

 
Have you ever thought about how carbohydrates and cheese form the basis of all the best food?

Pasta!  Lasagna!  Baguette!  Pizza!

Mac and cheese, anyone?  Grilled cheese?  Garlic bread?  Casserole?  Cheese and crackers! 

This bread cuts right to the point.  It feeds you what you want to eat:  carbs and cheese.


Well, all those elaborations, all those apologies, all those worries about calories, they just aren't necessary. 

What is necessary is this bread.  With cheese.

Oh, and onions.

Garlic Onion Cheesy Bread (adapted from Food Wanderings in Asia)

1 loaf of soft, fresh bread
1 stick butter, melted
1/8 c olive oil
3 t minced onion
6 cloves garlic, minced
1 T dijon mustard
1 T poppy seeds
12 oz grated cheese

Preheat the oven to 350 F.

Mix the melted butter, olive oil, onion, garlic, mustard, and poppy seeds in a bowl.

Slash the bread with X slices, making cubes without cutting all the way through the crust. 

Pour the butter mixture into the X cracks and over the top of the bread.  Fill the cracks with the grated cheese.


Wrap the loaf with foil, sealing it in and bake for 15 - 20 minutes.  Remove from oven and unwrap, and then bake for another 10 minutes to crisp up the cheese.

Homemade Hummus


Hummus. Is it too boring for a blog post? It's not black licorice creme brulee, or strawberry champagne cake (last spring was a good 'un for baking, wasn't it?).


Hummus. It's so simple. It's just six ingredients, all mashed up together in a blender. Six ordinary ingredients, with the possible exception of tahini, still somewhat exotic. But it's available at most grocery stores, either in the health food section or the Asian food aisle. Here in Oregon you can get it on tap, right between the shoyu and the molasses barrels. Lucky, I know.


Hummus. Too simple. But when I tasted this batch, and salt and lemon exploded over my tongue, tempered slightly with nutty tahini and earthy chickpeas, I immediately absconded with it to my bedroom, lest my husband want a taste.

All right. I gave him one taste. But just so he'd know what he was missing.


Since making this earlier this week, it's become a snack staple in the house. I like to keep a batch in the refrigerator at all times. And for the record, making your own takes just minutes and the ingredients cost far less than any commercial brand you can get at the store.


Hummus. Between cakes and cremes, it'll get you through.

1 can chickpeas/garbanzo beans (they are the same thing) drained, half the liquid preserved
2 cloves garlic
4 T lemon juice
2 T tahini
1 t sea salt (more or less to taste)
Pinch black pepper
1 T olive oil (I used 2 T in this recipe, but it didn't need that much)
Crackers, bread, pita bread, etc.

Put all ingredients except olive oil and bread/crackers/pitas in a blender and puree. Put in serving bowl, drizzle with olive oil. Serve with bread/crackers/pitas.

Garlic Breadsticks With Sea Salt


Sometimes I feel like I can do things, and sometimes I feel like I can't. Do you ever feel like that?


Some days I wake up and think, I can't believe it's raining AGAIN! Then I weigh the relative merits of staying in bed, going through my to-do list (clean this, clean that, go to work, watch T.V.) and find it thoroughly bores me. I realize right now that my most lucrative employment option is child care (and believe me, I love the kids, but this after a master's degree I put my soul into? Bit of a drag, really). My apartment is small and occasionally moldy (normal in Oregon - landlords say don't call us unless the spot is more than a square foot). I am forced to conclude that my life blows and is boring, and the best solution is to roll over and go back to bed (good thing I only work in the afternoons right?).


Other days I wake up and, after noting that it is yes, raining again, I find myself absolutely certain that I am destined for great things. A little farm house with chickens and apple trees? Sure! Paris? Why not? A published book and a home decorated with paintings and textiles made by yours truly, or selectively purchased from esteemed talented friends and associates. Making money off of doing something I like? Why not! The sky's the limit! And a small brood of well-groomed children and a happy husband to boot! This is my destiny!


Today I feel the latter, and it's wonderful. The respective worlds of cooking, art, blogging, fashion, writing, and etc. seem open to me, just ready for me to dive in. I'm volunteering at the Humane Society, signed up for art classes and approaching the prospect of natural childbirth with new confidence (thanks Ina May). Lucky me right?


Just wish I could control which days I feel which way!


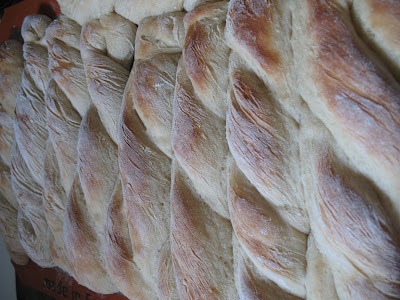
So check these out, they are THE garlick-iest breadsticks you will ever try! The crumb of the bread was oh so soft and chewy, the buttery coating was pungent and warm.


Maybe add a LITTLE less sea salt to the coating though - and believe me, coming from me that advice means these breadsticks were SALTY INDEED!


Perfect for dipping in one last thick, winter soup...a preview of things to come...


Oh and p.s. what ch'all think of my new header? Christmas present courtesy of My Friend Libby. It pays to have talented friends! This blog may be seeing construction from more than one of them soon (this is what happens when a non-techy person pursues a techy hobby - again, thank heavens for talented friends).

Garlic Breadsticks With Sea Salt (taken from Cheeky Kitchen, one of my favorite food blogs of all)

Ingredients:
1 packet (or 2.5 tablespoons) yeast
2 cups very warm water
1/4 cup sugar
3 cups flour
1 stick butter, melted
1 teaspoon garlic powder
1 tablespoon sea salt
2 tablespoons grated parmesan
2 tablespoons fresh chopped parsley

Preheat the oven to 300 degrees. Add the warm water to a large, glass or plastic bowl. Sprinkle the yeast on top, then the sugar. Stir slightly and allow to sit for 15 minutes. (The mixture in the bowl should now be foamy. If it's not, you might want to start over. Your yeast could be bad, or the water not hot enough to activate the yeast).

Stir the flour into the mixture one half-cup at a time, adding just enough to make the mixture soft, pliable and not too sticky, but not so floured that it becomes a heavy hunk. Knead it until the dough becomes elastic.

Pull a round of dough into your hands (about the size of a small apple). Roll it into a long, thin rope, fold it in half, then twist the two sides around each other to form a 4-5 inch long breadstick twist. Place on a baking sheet that has been covered with parchment paper. Once all of the dough in twisted, you can bake it right away (if you're in a hurry), or allow your breadsticks to rise for 15-30 additional minutes (doing so will yeild softer, lighter breadsticks).

Place breadsticks in the preheated oven, allow them to cook for 5 minutes, then turn the heat up to 400 degrees and bake them until golden brown, about 7-10 minutes more.

As soon as you remove your breadsticks from the oven, mix together the melted butter, garlic powder, sea salt, and grated parmesan. Drizzle over hot breadsticks. Sprinkle with fresh chopped parsley and serve immediately.

Sour Cream Stuffed Twice-Baked Potatoes


So one thing baby loves, loves, LOVES (and by baby I mean both myself and the child cookin' in my womb) is steak. But sometimes when I'm sitting by myself in my apartment, gollum-like, cramming an extra-rare ribeye into my mouth with my fingers (pregnancy is such a SPECIAL time!), I start to feel like maybe my meal should be a bit more...civilized.


And what's more civilized than potatoes?


Okay, lots of things. But what goes better with steak than potatoes? Nothing!


So I give you...sour cream stuffed twice-baked potatoes! They are extremely easy, and extremely delicious. Baking potatoes must be the easiest thing in the world, and these take only slightly more effort than that.


I put a lot of photographic emphasis on the potato baking part, if only because it is very important to me, when baking a potato, to have the perfect skin (also um my husband and I ate them too fast to take many more good pictures...this keeps happening to me). Do it with olive oil and salt and you will have a crispy, crackly, perfectly salted skin that is just to die for.


The fillings are optional and flexible - you should put in what you like best with potatoes. For me the focus was on green onions, sour cream, cheese, and my beloved chili powder. But they would be great with salsa, garlic, bacon, anything.


So next time you are eating your steak so rare it's dribbling blood down your chin and you love it (and YES, I was once a vegetarian), don't forget the stuffed potatoes!

Sour Cream Stuffed Twice-Baked Potatoes

Ingredients (all of these measurements come with the caveat 'to taste')

2 potatoes (I like yukon golds, but there are plenty of other types that are good)
sea salt
1/2 t olive oil
1/3 c sour cream
4 chopped green onions
1/2 c cheese
chili powder
any other toppings you want!

Preheat oven to 350. Wash potatoes thoroughly, chop out any dark spots. Dry them, poke several times with a fork. Rub each one with a few drops of olive oil. Dash each with salt on both sides. Put in heated oven directly on the rack. Bake until soft, about 45 minutes.

Remove from oven. Holding potato with hotpad, carefully slice off the top and place in bowl (you can discard it if you like, but I don't like to waste any part of the potato). Carefully dig out soft potato insides with spoon, keeping peel as intact as possible. Do this with each potato. Place skins on cookie sheet.

Add sour cream, green onions, and any other mix-ins you are using to the potatoes in the bowl and mash them all together. Keep adding sour cream (or milk) until you get a nice, mashed potato texture. When you are happy with the texture, carefully refill each potato skin with the new mixture. Top with cheese, green onions, and chili powder, and return to the oven for about 20 minutes, or until the cheese is melted.

Quick and Easy Non-Fried French Fries


So yup, my food needs have changed yet again. The lightning-quick changes in my desires and abilities (both eating and non-eating!) brought to me by el bun in el oven really do keep me on the edge of my seat.


FOR EXAMPLE. Last week I couldn't TOUCH anything greasy. I couldn't eat much more than bland bread and soup (although it was really good soup, right? right?), and was lucky if I could force down three meals a day.


THIS week, so help me, I gotta eat! I'm trying to be practical about it, you know, wise. Not eat too much, pile it all on there. But it really is stunning to go from completely full for the day on one meal, to eating that same meal three or four times a day and still starving again only two hours later.


This could get expensive.


So anyways, today this flash flood of hunger hits me about two hours after breakfast. I run into the kitchen, flinging garlic bulbs, dry black beans, and other inedibles (at least non-instant edibles) aside, desperate for something I can put in my stomach and fast.


While I'm flinging, I notice some lovely yukon gold potatoes hanging around. And I says to myself, "Boy I wish I'd known an hour ago I would feel like this. I would have put these in the oven for baked potatoes. *Sigh* No time for that now."


And that's when I remembered...this recipe. Quick and easy non-fried French fries, an old favorite I used to make all the time, and then inexplicably forgot completely. Until this morning.


And I want to share it with you. Do you, like me, want to turn inedible raw taters into crispy, salty goodness in about twenty minutes? Have a look-see.


Now as you may have noticed from the title of the post, these fries are not actually fried (bakes?). They are baked, but they are broiled with olive oil beforehand to give them that requisite crispiness. The effect is wonderful - crispy and smooth flavor, but soft and warm and potato-y on the inside. They are like those home fries you get at the good restaurants and you're like, now I KNOW these were not frozen ten minutes ago!


Another great thing about this recipe is that it is flexible. You could use any kind of potato for it, including sweet potatoes and yams. I've done both in the past and they've turned out amazing. Fast, healthy (well, moreso than other fries), filling and flexible. Yup. That'll do!

Quick and Easy Non-Fried French Fries (adapted from the Student's Vegetarian Cookbook, a lovely little book that has been with me for quite some time)

Some potatoes (like how exact I'm being? Make as much as you want!)
Some olive oil
Some seasonings (my favorites are simple, salt, pepper, and chili powder - but you could go all sagey and extravagant if you wanted! Follow your french-fried heart)

Heat the oven to broil.

In the meantime, chop up them taters (this is what it looks like when I write a recipe from memory, okay?), matchstick like, or whatever thickness you prefer. Drizzle them with olive oil, and then toss them around so they get coated.

Season how you like.

Spread on a baking sheet, so none are piled up or touching.

Broil, 3-4 minutes or until they reach the brownness you prefer. Then pull them ou, flip them with a spatula, and broil them on the other side until they are even.

Turn oven heat down to 400, and move the pan onto a lower shelf. Let them bake about 10 - 15 minutes, keeping an eye on them for burnage (I burned my first few batches when I started making these, it's best to watch them close at first).

Eat 'em up! For this batch I made a quick sour cream dipping sauce, with salt and chili powder stirred in, but they are good with anything fries are good with. Ranch, ketchup, mayonnaise, you name it.

Veggie Disasters!


Well, my friends, you win some you lose some, right?


Well, this past week, I lost several. This is how it went down. My calavera Halloween pumpkins were getting old. And then last week's delicious Sweet Potato, Carrot, Apple, and Red Lentil Soup reawakened me to the amazing goodness that is VEGETABLES!


But I think I got a little giddy, a little veg-drunk. I decided I would have a vegetable heyday, the likes of which you have never seen.


It would be a veritable orgy of transforming raw vegetables into delectable treats.


I chose, for this project, roasted pumpkin (to use up my Halloween pumpkins, still trooping along on the porch), purple carrot souffle with streusel topping (how could it possibly go wrong?) and kim chi.


I don't know if everyone who reads this site is a fan of kim chi, but it is one of those weird foods that will make you grimace when you first taste it, shrug the second time, and become completely and utterly addicted the third. I've been craving it since I came back from Seoul a year ago, and failed to make it every time since.


If anyone knows any good kim chi recipes, I will love you forever.


Note: never undertake a project like this without a good knife. Lesson learned.


Anyways, three dishes, three kinds of colorful, delicious, fresh, jewel-tone veggies. The results?


Sub! Par!


The souffle was simultaneously too sweet and too salty. How does THAT happen?


It was a pretty color though.


The kim chi, after sitting two days in my authentic kim chi pot (birthday 2009 thanks honey!), had the taste and appearance of plain cabbage that has been sitting in water for two days. Somehow the seasonings had not taken at ALL.


It's still in my fridge, in fact, but I don't have much hope for it.


Sub par.


The pumpkin was the only thing that turned out decent, and with a recipe so simple I would have really felt bad to have messed it up.


I just didn't like it because it turns out I don't like the flavor of fresh pumpkin!


I'm working on that, though. I don't like not liking things.


So the pumpkin recipe is the only one I'm including here today, since it was a matter of taste, not skill, that made it a "veggie disaster," and you may very well love it.


*sigh* So much for my veggie extravaganza. Thanks for trying though.


I guess it's back to butter, cream, and cookies for me. I guess the universe just wants it that way. And who am I to fight the universe?


This roasted pumpkin recipe comes directly from one of my favorite food bloggers, David Lebovitz, who lives and writes in Paris.

Roasted Pumpkin (Potimarron)

There really isn’t any need for a specific recipe for roasting potimarron; simply wash the outside well, dry it, then cut it in half with a large knife. (Be careful as the round shape can make it move around a bit.) Once halved, use a large spoon to scoop out the seeds.

Preheat the oven to 400ºF (200ºC) and drizzle a few tablespoons of olive oil on a rimmed baking sheet. You can use a non-stick sheet one or line the pan with parchment paper for easier clean up.

Sprinkle with coarse or sea salt and black or chili pepper. Other additions can include some thinly sliced garlic; fresh thyme, rosemary or sage; or cinnamon and brown sugar or maple syrup, replacing the olive oil with butter.

Slice the potimarron into crescents about the width of your thumb and toss them in the olive oil and other ingredients on the baking sheet. They should be in a single layer. (If you have a lot, roast them on two trays, or refrigerate the rest for another day.)

Roast the slices on the lower rack of the oven for 20 to 30 minutes, flipping them midway during baking, until they’re cooked to your liking.